MADELINE LEWIS DESIGNS

MADELINE LEWIS DESIGNS

Saturday, May 4, 2013

Pretty Butterfly Prints

We are in the process of redoing my girls room (or at least updating it) due to the fact my 3 year old is joining my 6 year old...bunk beds and all!

I have been looking for a purple butterfly print to hang on the wall.  They have a sweet bird and butterfly theme going on.  I haven't been able to find what I'm looking for (I'll know it when I see it).  So......... I designed one myself!  I just wanted something simple, sweet and square.  I loved it so much..I made it in several colors.

On sale in my Etsy store now!!


Enjoy!  As always..Celebrate Perfectly!

Stephanie


Sunday, April 14, 2013

500th Facebook Fan Logo Giveaway!!

We are super excited here at Madeline Lewis to be reaching our 500th fan!  In celebration, we are giving away a free logo design!!!

578402_10151285810336986_1210468920_n.jpg


Here are the details on how to enter:

1) Become a fan of Madeline Lewis on Facebook

2) Leave a comment on this post stating your name, business name AND email address! ( I will need to be able to contact you should you win:))

3) A winner will be picked on Friday April 18th at 12:00 p.m. via random.org

4) Winner will receive an email with our business logo questionnaire and the designing will begin!!


526370_10151237543956986_1059751189_n.jpg


Rules:

1) Please enter a business only once.

2) All logos are custom designed from scratch...please no re-worked logos. (for example, no changing the color of an existing logo)

3) Once the logo is designed, winner will receive a JPEG, PDF, GIF and PNG files.

4) The logo design process can take anywhere from 2 weeks to 1 month.  Please no rush jobs.

Please contact Stephanie at stephanie@madelinelewisdesigns.com for questions.


17503_10151237532081986_882194775_n.png

Thank you again to all those who helped us reach our 500 fan goal!!

Good Luck and as always...celebrate perfectly!!

Stephanie


Tuesday, March 19, 2013

Candy Buffets..Hit or Miss???


Don't be fooled by the title...I love candy buffets.  I think they are a great way to add  color, decor AND favors all in one.  Not to mention, they are always a guest fav.  I don't care who you are, when you walk into an event and see all those jars filled with sugary treats with fun little bags, your heart goes pitter patter (right?????).

However...like anything else..there is a right way to style a candy buffet and a wrong way.  I have gathered some of the best tips and tricks to help pull off the perfect candy buffet.

1) Pick a color...any color..maybe two, but no more.   Do not go crazy with color.  The more colors you add the more complicated the design gets..stick with two colors to keep it simple and DIY!.  Not to say that there are not many candy tables that use lots of color and are simply beautiful, but unless you are really good at color and design, keep the table clean, simple and eye catching.

Elizabeth Anne Designs
2) Use the same style jar for your table.  Not the same size jar, but the same style.  The glass,  jar openings and lids should all be similar.
Jessica's Design Shop

3).  Add a few theme touches to the table, but not too many.  You want the focus to be the candy, not all the knick-knacks and glitter.  If you have too many "props" on your table,  it makes it difficult for your guest to maneuver around them to fill up those cute little bags.  This is also true for your table linen.  It seems the best tables have clean flat linens...not ones so bunched up, you cannot see the jars.

Candy Buffet - Rock Candy Bar
Mazel Moments


4) Use good signage.  It is important to know what your guest are eating.  Make sure your jar signs fit the jars.  You do not want a huge sign on a little jar and a little sign on a huge jar.  Your stationery vendor should be able to help you with these.
The Candy Buffet Company


5) Provide a good back drop.  Nothing worse then see a beautiful table pushed up against an ugly wall.  
Mariana Zago Party Design   


Stick to these basics and you can proved a knock out candy buffet that will WOW everyone!

As Always...Celebrate Perfectly!

Stephanie


Wednesday, March 13, 2013

Invitation Etiquette....just sayin'

As we approach our 5th birthday here at Executive Creations, I think back to my first wedding invitation I designed and how far we have come!  During this time, I have come across some major no no's when in the invitation world. I'm not talking about the invitation "wording" in general.  There are so many rules with those, I can't even keep them strait!  Real Simple Weddings has a great article here

Here are some of my pet peeves that I've come across.

1) White envelopes with a colored invitation.  While, I cannot find any hard fast rules against this..I don't like it.  The envelope should match the invitation, so if you have a hot pink and black invite, please use a hot pink or black envelope.  Colored envelopes are usually just a few dollars more then white..sometimes not enough to make a difference at all.   If your invitation is mostly white or one of your primary colors, then go with white.  Oh yeah..if your stationer does not provide colored envelopes, you need to dump him or her and come see me:)


2)  Putting Stamps on your RSVP envelope or RSVP postcard.  YOU MUST DO THIS!  I have had more then one bride try to skip this step to save money.  NO NO NO!  You must provide the stamp if you expect to have any piece of mail returned to you.  Not only does it make you look cheap, it is rude.  Not to mention, you will have responses coming in much slower (after all..they had to drop everything and go buy a stamp) which may delay you getting accurate numbers to your vendors.

While we are on the subject of stamps....let's not do the "forever stamp"  For your bills..yes..for one of the most important days of your life..no.  There are so many options out there..not to mention, you can have a custom stamp designed that matches your invitation.  A bit more dollar wise, but totally adds personality to your perfect invite.  Again, if your stationer does not do custom stamps..dump and come to me.


3) Hand addresses envelopes.  Okay..so I know I might get hate mail over this.  Unless you have SUPER beautiful hand writing or hire a calligrapher, stick to labels or printed envelopes.  I know some of my paper friends balk at the idea of labels, but I think they look so much better then chicken scratches.  You can even get clear labels from most office supply stores..and on metallic envelopes, they are hard to tell you have a label.  Also..you might be surprised how nicely your little desk top printer will do with envelopes.  I had one bride that had over 200 invitations.  Instead of paying someone to do them for her, she bought a new printer for $50.00 and did them herself (saving her $150.00).

While we are on the subject of envelopes...please spell out the whole address.  I hate it when I see IN or Dr.  You put a lot of work into your invite...keep it pretty!


Simple Radiant Events has a great article on the proper way to address the outside an envelope.

4) Putting where you are registered or asking for money on your invitation. Just Don't..it's tacky..there..I said it.  Dana Scott is more articulate.


5) Stealing a friends wedding invitation.  I have on the rare occasion come across a bride that shows me an  invitation from a wedding she has just been at and wants the same invitation.  First of all..it's not nice to copy your friend, Second, I am not going to steal another designer's design.  If you really want the same invite, you should go to your friend, ask her who designed her invite and then go to the designer and ask her to do another one.  Good Luck with that.  I encourage brides to bring me samples of what they love and we can get some inspiration from another design.  But to outright copy it is wrong.

As Always, Celebrate Perfectly!

Stephanie
  

Tuesday, February 12, 2013

Sweet Southern Valentine Soiree


I had so much fun styling this Sweet Southern Valentine Party for my daughter and her little friends.  I held it in the afternoon, so all her preschool and half day kindergarten friends could join her (big kids were at school) which made it more special!!

Thank you to Felicia Tilman Photography for taking photos!!


Cupcake wrappers are from http://www.etsy.com/shop/CupcakeExpress


These sweet little bags are from
http://www.etsy.com/shop/RunEllieRun
I printed out the names on transfer paper and ironed them on.


Her invitation...designed by Madeline Lewis


Cupcake toppers by Madeline Lewis


I love this idea!!  I think I saw it on pinterest:) (where else??)
I had my hubby drill holes in the top to stick the straws in! 
The straws  are from http://www.etsy.com/shop/CupcakeSocial

The girls LOVED these drinks...I think they were the hit of the party!


Animal Crackers!!!


wrapped up candy bars were treats for the moms!
"be mine" tags from http://www.etsy.com/shop/CharonelDesigns


I totally fell in love with these little berry baskets from
http://www.etsy.com/shop/pinklemonadeparty
on to the next party!


Stephanie

Monday, February 4, 2013

Monday Craft: Modge Podge Wrapped Easter Eggs

One of my favorite Martha Stewart Living Magazine Covers is the one with her Easter Tree on the front. 

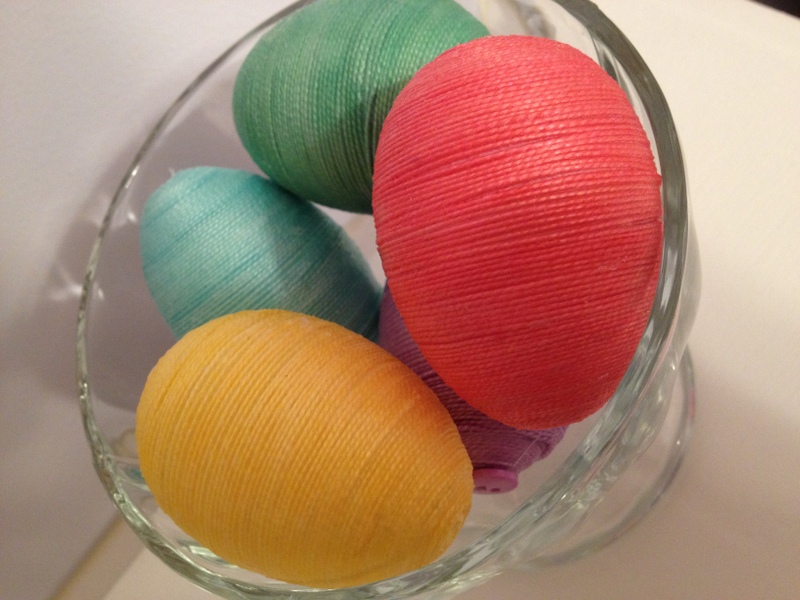
I was in the cross stitch aisle at the craft store the other day and was struck by all the beautiful colors they have available.  I remembered those wrapped eggs from Martha Stewart and thought I would give it a whirl.  After a few eggs..I finally got the hang of it:)  

Here is her tutorial..she uses embroidery thread and Styrofoam eggs.  I used cross stitch floss and plastic eggs.

Here's what you need:
-plastic eggs
-cross stitch floss
-modge podge
-scissors


start with using a generous amount of modge podge on the top of the egg with a paint brush.  About a nickel size glob.
Lay the end of the cross stitch floss in the modge podge.  Let it get pretty saturated.  With the end of your paint brush start twirling until you get a good circle started. 

Start wrapping the floss around until you have a tight circle going.
Continue to add more modge podge as you go. 
Once your upper layers have started to set, brush a generous amount of the modge podge  on top of the floss.
Keep going until you get down to the seam of the egg (about half way). I used a bottle cap to hold it while it dried.
Once dried, start on the other side following the same steps. 
Keep going until your seams meet.  You may have to do a bit of overlapping, but the more I did, the better I got at them matching up perfectly.

I added some buttons on the bottom with hot glue so they can stand up on there own.

I love how they turned out! They are super fun to do!  


Have fun!  And as always...celebrate perfectly!

Stephanie